INTRODUCTION
Many people see the finding of defects as the purpose of testing. While it should be clear that the purpose of testing
is much more, i.e. the provision of information and advice concerning risks and quality, the fact remains that finding
defects is one of the most important activities of testing.
A defect is also termed a ‘fault’. Confusion sometimes arises concerning the various terms, such as errors, faults and
failures. In this book, the following distinction is made:
-
Error - Human mistake; this action takes place prior to any faults and/or failures.
-
Fault - Results from an error. Fault is the view from inside the system. Fault is the state where mistake or error
exists. Developers will see the fault.
-
Failure - When the system is performing differently from the required behaviour, from a viewpoint outside the
system. Users will see the failure.
In this book, the following definition of defect is used: A defect (fault) is the result of an error residing
in the code or document.
Testers should realise that they are a) judging another’s work, and b) that the final product is the result of
cooperation between all parties. It is more considerate towards the other party to find a discrepancy between what the
software does and what the tester expects, based on the available information, than if the tester immediately exclaims
that he has caught the developer out in a mistake. The latter has a polarising effect and quickly becomes a discussion
on who has made the mistake, instead of a discussion on how best to solve the defect. In some cases, the testers employ
terms such as "issues”, “problems” or “findings” rather than defects. The tester should adopt as neutral an attitude as
possible in connection with defects. Another good reason for adopting this attitude is that the cause of the defect
often turns out not to lie with the developer, but with the tester himself. In a situation in which developers and
testers stand opposite each other instead of side by side, a number of unjustified defect reports can destroy the
testers’ credibility entirely.
Administering and monitoring the defects also involves the solving of them. This is actually a project matter and not
specifically a matter for the testers, although testers have the greatest involvement here. Good administration should
be able to monitor the life cycle of a defect and also deliver various overviews, which are used, among other things,
to make well-founded decisions on quality. This management is sometimes assigned to a dedicated role: defects
administrator (see Defect Administrator in Roles Not Described As A Position).
From within the test process, the testers are the submitters of defects, and they check the solutions of these. The
test manager communicates with the other parties concerning (the handling of) the defects. The choice may also be made
to place this task within a separate role in the team: the intermediary. The purpose of this is to channel the defects
and the associated solutions effectively. In this regard, the intermediary maintains external contacts at the level of
staff doing the actual work. This person has an overview of all the defects and acts as a relay and inspection post for
the defects on the one hand, and the solutions on the other. Advantages of this are that the quality of the defects and
solutions is monitored better and that communication is streamlined.
There are great advantages to be gained in organising one single defects administration and defects procedure for the
entire project or the entire line department. All the parties involved – developers, users, testers, QA people, etc.
can deposit both their defects and solutions here. Communication on the handling of the defects is thus considerably
simplified. A central administration also offers extra possibilities of obtaining information. The authorisations are a
point to note here; it should not be possible for unauthorised persons to be able to amend or close defects by this
means.
FINDING A DEFECT
Defects may be found practically throughout the entire test process. The emphasis, however, is on the phases of
Preparation, Specification and Execution. Since, in the Preparation and Specification phases, the test object is
normally not yet used, in these phases the testers find defects in the test basis. During the Execution phase, the
testers find differences between the actual and the expected operation of the test object. The cause of these defects,
however, may still lie within the test basis.
The steps that the tester should perform when a defect is found are described below:
-
Collect proof
-
Reproduce the defect
-
Check for your own mistakes
-
Determine the suspected external cause
-
Isolate the cause (optional)
-
Generalise the defect
-
Compare with other defects
-
Write a defect report
-
Have it reviewed.
The steps are in a general order of execution, but it is entirely possible to carry out certain steps in another
sequence or in parallel. If, for example, the tester immediately sees that the defect was found previously in the same
test, the rest of the steps can be skipped.
Collect proof
At a certain point, the test object produces a response other than the tester expects, or the tester finds that the
test basis contains an ambiguity, inconsistency or omission: a defect. The first step is to establish proof of this
anomaly. This can be done during the test execution, for example, by making a screen dump or a memory dump, printing
the output, making a copy of the database content or taking notes. The tester should also look at other places where
the result of the anomaly could be visible. He could do this, for example, in the case of an unexpected result, by
using an Edit function to see how the data is stored in the database and a View function to see how it is shown to the
user. If the defect concerns a part of the test basis, other related parts of the test basis should be examined.
Reproduce the defect
When a defect is found during test execution, the next step is to see whether it can be reproduced by executing the
test case once more. The tester is now on guard for deviant system behaviour. Besides, executing the test again helps
with recognising any test execution errors. If the defect is reproducible, the tester continues with the subsequent
steps. If the defect is not reproducible and it is not suspected to be a test execution error, things become more
difficult. The tester executes the test case again. He then indicates clearly in the defect report that the defect is
not reproducible or that it occurs in 2 out of 3 cases. There is a real chance that the developers will spend little or
no time on a non-reproducible defect. However, the point of submitting it as a defect is that this builds a history of
non-reproducible defects. If a non-reproducible defect occurs often, it may be expected to occur regularly in
production as well and so must be solved.
Example 1 - During a system test, the system crashed in a non-reproducible way a couple
of times a day. The test team reported this each time in a defect report, but the development team was under pressure
of time, paid no attention to this defect, and dismissed it as an instability of the development package used. By
reporting the large number of non-reproducible defects and indicating that a negative release advice would result, they
were finally persuaded. Within a relatively short time, they found the cause (a programming mistake) and solved the
problem.
In some cases, such as with performance tests and testing of batch software, it costs a disproportionate amount of time
to execute the test again. In those cases, the test to see whether the defect is reproducible is not repeated.
Check for your own mistakes
The tester looks for the possible cause of the defect, first searching for a possible internal cause. The defect may
have been caused, for example, by an error in:
The tester should also allow for the fact that the test results may be distorted by the results of another test by a
fellow tester.
If the cause is internal, the tester should solve this, or have it solved, for example by amending the test
specification. Subsequently, the tester repeats the test case, whether in the same testing session or in the following
one.
Test environments and test tools usually come under the management of the testers. Defects in these that can be solved
within the team belong to the internal defects, and those originating from outside the team are external defects.
Determine the suspected external cause
If the cause does not lie with the testing itself, the search has to widen externally. External causes may be, for
example:
-
Test basis
-
Test object (software, but also documentation such as user manuals or AO procedures)
-
Test environment and test tools.
The tester should discover the cause as far as possible, as this would help in determining who should solve the defect
and later with discerning quality trends.
Because the tester compares his test case against the test object, there is the inclination in the event of an anomaly
to point to the test object as the primary cause. However, the tester should look further: perhaps the cause lies with
the test basis? Are there perhaps inconsistencies in the various forms of test basis?
As well as the formal test basis (such as e.g. the functional design or the requirements), the tester regularly uses
other, less tangible forms of test basis. These may include the mutual consistency of the screens and user interface,
the comparison with previous releases or competing products, or the expectations of the users. In describing a
defect, it is thus important to indicate which different form of test basis is used, and whether or not the test object
corresponds with the formally described test basis, such as the requirements or the functional design. If the test
object and the formal test basis correspond, the cause of the defect is an inconsistency between the informal and
formal test basis and not the test object.
Example 2 - During an exploratory test, the tester discovers that the position of the
operating buttons vary on many screens. Further investigation shows that the cause lies with the screen designs and not
with the programming. The tester submits the defect, citing the test basis as the cause.
An external defect is always managed formally. This may be in the form of the defect report and defects procedure
described in the sections below. Where reviews are concerned, a less in-depth form may be chosen in which the defects
are grouped into a review document and passed to the defect solver; see also Evaluation Techniques.
Isolate the cause (optional)
While the suspected cause is often apparent, in the case of a defect in the test object or the test environment, it is
often insufficiently clear to the defect solver. The tester therefore looks at surrounding test cases, both the ones
that have been carried out successfully and the ones that have not. He also makes variations where necessary to
the test case and executes it again, which often results in indicating a more exact cause or allows further
specification of the circumstances in which the defect occurs. This step is optional, since it lies on the boundary of
how far the tester should go in respect of development in seeking the cause of a defect. It is important to make
agreements with the developer on this beforehand. This can avoid discussions on extra analysis work later on, when test
execution is on the critical path of the project.
Generalise the defect
If the cause appears sufficiently clear, the tester considers whether there are any other places where the defect could
occur. With test object defects, the tester may execute similar test cases in other places in the test object. This
should be done in consultation with the other testers, to prevent these tests from disrupting those of his colleagues.
With test basis defects, too, the tester looks at similar places in the test basis (“In the functional design, the
check for overlapping periods for function A has been wrongly specified. What is the situation as regards other
functions that have this same check?”).
Example 3 - During a Friday-afternoon test, the parallel changing of the same item by
two users in function X produced a defect. Further testing on other functions showed that the multi-user mechanism had
been wrongly built in structurally.
The tester need not aim for completeness here, but should be able to provide an impression of the size and severity of
the defect. If the defect is structural, it is up to the defect solver to solve it structurally. This step also has the
purpose of building up as good a picture as possible of the damage that the defect could cause in production.
Compare with other defects
Before the tester writes the defect report, he looks to see whether the defect has been found previously. This may have
been done in the same version of the test object by a fellow tester from within a different test. It is also possible
for the defect to have been reported in an earlier release. The tester consults with the defects administration, his
fellow testers, the test manager, defects administrator or the intermediary to find out.
There are a number of possibilities:
-
The defect was found in the same part of the current release. The defect need not be submitted. The test case in
the test execution report may refer to the already existing defect.
-
A similar defect has already been found in another part of the current release. The defect should be submitted
and should contain a reference to the other defect.
-
The defect has already been found in the same part of the previous release. If the old defect was to have been
solved for this release, it should be reopened or resubmitted with reference to the old defect, depending on
the agreement. If the old defect is still open, the tester need not submit a new one.
Tips:
-
The test manager, defects administrator or intermediary would be well advised to send frequent overviews of found
defects to the testers. This keeps the testers abreast of found defects and prompts them to look within their own
test for similar defects. Alternatively, the testers could regularly consult the defects administration concerning
found defects.
-
It may also be agreed that the testers do not look at duplicate defects, to avoid disrupting the progress of the
test execution. Checking for duplicate defects is then done by the intermediary, who would be empowered to combine
duplicate defects. In cases of doubt, the intermediary should of course consult with the testers involved.
Write a defect report
The tester documents the defect in the defects administration by means of a defect report. In this, he describes the
defect and completes the necessary fields of the report; see Defect report. The
description of the defect should be clear, unambiguous and to the point. The tone should remain neutral, and the tester
should come across as impartial, being conscious of the fact that he is delivering bad news. Sarcasm, cynicism and
exaggeration are obviously to be avoided.
Ideally, the tester makes clear what the consequences are in the event of the defect not being solved, or what the
damage might be in production. This determines the chances of the defect being solved after all. In some cases, the
damage is very clear (“Invoices are wrongly calculated”) and little explanation is necessary; in other cases, it is
less clear (“Wrong use of colour in screens”) and the tester should clearly indicate what the consequences could be
(“Deviation from business standards means that the External Communication department may obstruct release of the
application”). Otherwise, it is by no means always possible for the tester to estimate the potential damage, as he
lacks the necessary knowledge. The final responsibility for estimating the damage lies with (the representatives of)
the users and the client in the defects consultation, which is discussed later. A difficult question is always how much
information the description should contain. The guideline for this is that the defect solver should be reasonably able
to solve the defect without further explanation from the tester.
‘Reasonably’ in the above sentence is a difficult concept. The developer would prefer the tester to indicate which
statement is wrong in the software. However, this is debugging and comes under the responsibility of the developer. The
situation should be avoided in which the tester regularly sits with the programmer to search together for the cause of
the defect. This indicates poorly written defects rather than collaborative testing. The tester is at that point no
longer involved in testing operations, as the test manager expects of him. If this happens regularly, it will render
the plan of the test process unmanageable.
In some cases, the tester finds many small defects in a particular part, e.g. a screen. The inclination is then to keep
the administration simple by grouping all these defects into one collective defect report. There is sometimes pressure
from the developers to do this, either for the same reason or to make the number of defects appear lower. This is
rarely advisable. The chances are that, out of such a collection, a number of defects will be solved in the subsequent
release, a number will be solved in the release following, and a number will not be solved at all. Following and
monitoring such a collective defect thus becomes an administrative nightmare.
Have it reviewed
Before the defect formally enters the defects procedure, the tester has the report reviewed for completeness, accuracy
and tone. This may be done by a fellow tester, the test manager, defects administrator or the intermediary. After
processing their comments, the defect is formally submitted. This is performed in accordance with the procedure
described in section Procedure.
For more information on handling a defect, see [Black, 2004].
DEFECT REPORT
A defect report is more than just a description of the defect. Other details on the defect need to be established (e.g.
version of the test object, name of the tester). In order to do this in a structured manner, a defect report is often
divided into several ‘fields’, in which the various details can be laid down that are necessary for the management of
the defect and for obtaining meaningful information from the administration. The most important reasons for including
separate fields, rather than one large free-text field, are:
For example, it is easy to select all the outstanding defects, all the defects with the test environment as a cause or
all the defects in a particular part of the test object.
Defect reports are almost impossible now without automated support. This may be a simple spreadsheet or database
package, but there are also various freeware or commercial tools available. The latter group of tools often has the
advantage that the defects administration is integrated with testware management and plan and progress monitoring.
Attention should be paid to the matter of authorisations with the tools. It should not be possible for a developer to
change or close a tester’s defect, but it should be possible for the developer to add a solution to the defect.
If testers and other parties are geographically far removed from each other, as is often the case with outsourcing or
offshoring, it is advisable to purchase a web-enabled defects tool. This allows all the parties to directly view the
current status of the defects administration and significantly eases communication on defects.
In some organisations, the defects administration is placed within the incidents registration system of the production
systems. While this is possible, such a system contains many more information fields than are necessary for a defect.
Sometimes this can be adjusted, but sometimes the testers have to learn to deal with the complex system and ignore all
the superfluous fields on the screen. This requires decidedly more training time and involves a greater likelihood of
incorrect input of defects than with a standard defects administration.
If the defects are stored in an automated administration, a range of reports can be generated. These are very useful
for observing certain trends concerning the quality of the test object and the progress of the test process as early as
possible. For example, ascertaining that the majority of the defects relates to (a part of) the functional design, or
that the defects are concentrated in the screen handling. Such information can be used again for purposes of timely
intervention and adopting measures.
The success of the defects administration is determined to a significant degree by the testers’ discipline in
completing the fields. To this end, the testers should first be sure of the content of each field and how it should be
filled in. Particularly in the beginning, there is a need for guidance and monitoring of the completion of defect
reports. This is usually a role for the test manager, defects administrator or intermediary, and forms part of the step
“Have it reviewed” in section Finding a defect.
The uniformity and consistency of a defect report can be improved by restricting the possible input values for the
fields, instead of using freetext boxes. For example, for the cause of a defect, a choice can be made between test
basis, test object or test environment. This prevents all kinds of synonyms from being entered (‘software’, ‘code’,
‘programming’, ‘program’, ‘component’) that severely obstruct or render impossible any later selection of cause of
defect.
A description is first given below of what a defect report should minimally contain. Subsequently, various
recommendations are given as regards expanding on this.
Minimum fields in a defect report
A defect report contains the following fields at minimum:
-
Project or system name - The name of the (test) project or of the system under test.
-
Unique identification of the defect - A unique identity, usually in the form of a (serial) number of the defect
report, for purposes of management and tracking progress.
-
Brief characterisation - A brief characterisation of the defect in a limited number of words, maximum one sentence
that preferably also clearly indicates the consequence of the defect. This characterisation is printed in defects
overviews and makes the defect more communicable.
-
Submitter - The name of the individual who has submitted the defect.
-
Identification of phase/test level - The phase or test level in which the defect was found, e.g. design,
development, development test, system test, acceptance test or implementation.
-
Severity - The severity category proposed by the tester. This categorisation reflects the damage to the
business operations. For example:
-
Production-obstructive - involves (high) costs, e.g. because the defect will shut down operations when
the system goes into production
-
Severe - (less) costs involved, e.g. because the user has to rework or add items manually.
-
Disruptive - little or no costs involved, e.g. chopping of alphanumeric data on the screen or issues
relating to user-friendliness
-
Cosmetic - wrong layout (position of fields; colours) which is not a problem for the external client,
but can be disturbing to the internal employee.
-
Priority - The priority of the solution proposed by the tester. Possible classification:
-
Immediate reworking required, e.g. a patch available within 48 hours that (temporarily) solves the problem.
The test process or the current business operations (if it concerns a defect from production) are seriously
obstructed.
-
Reworking required within the current release. The current process can continue with work-arounds, if
necessary, but production should not be saddled with this problem.
-
Reworking required eventually, but is only required to be available in a subsequent release. The problem
(currently) does not arise in production, or else the damage is slight.
-
At first sight, it does not appear important to make a distinction between severity and priority. These usually run
in sync, so that a high level of severity implies a high priority of solving. However, this is not always the case
and that is the reason for distinguishing both categories. The following examples illustrate this:
1) With a new release, the internally allocated nomenclature in the software has been amended. The user will not be
aware of this, but the automated test suite will suddenly stop working. This is a defect of low severity, but
test-obstructive and therefore of very high priority.
2) The user may find a particular defect so disturbing that it may not be allowed to occur in production. This may
be, for example, a typo in a letter to a customer. This, too, is a defect of low severity that nevertheless needs
to be reworked before going into production.
3) A potentially very serious defect, e.g. the crashing of the application with resulting loss of data, only occurs
in very specific circumstances that do not arise often. A workaround is available. The severity level is high, but
the priority may be lowered because of the work-around.
-
Cause - The tester indicates where he believes the cause to lie, for example:
-
TB: test basis (requirements, specifications)
S: software
DOC: documentation
TIS: technical infrastructure.
-
Identification of the test object - The (part of the) test object to which the defect relates should be indicated
in this column. Parts of the test object may be e.g. object parts, functions or screens. Further detail may be
supplied optionally by splitting the field into several fields, so that e.g. subsystem and function can be entered.
The version number or version date of the test object is also stated.
-
Test specification - A reference to the test case to which the defect relates, with as much relevance to the test
basis as possible.
-
Description of the defect - The stated defect should be described as far as possible in accordance with the
guidelines in section Finding a defect.
-
Appendices - In the event that clarification or proof is necessary, appendices are added. An appendix is in paper
form, such as a screen printout or an overview, or a (reference to an) electronic file.
-
Defect solver - The name of the individual who is solving the defect, has solved it or has rejected it.
-
Notes on the solution - The defect solver explains the chosen solution (or reason for rejection) of the defect.
-
Solved in product - Identification of the product, including version number, in which the defect should be solved.
-
Status + date - The various stages of the defect’s life cycle are managed, up to and including retesting. This is
necessary in order to monitor the defect. At its simplest, the status levels of “New”, “In process”, “Postponed”,
“Rejected”, “Solved”, “Retesting” and “Done” are used. The status also displays the date.
Possible extensions
Besides the above fields, various other fields may be added to the defect report. The advantages of including one or
more of the fields below are better management and more insight into the quality and trends. The disadvantages are the
extra administration and complexity. Experience shows that the advantages far outweigh the disadvantages in
medium-sized and big tests or in cases in which a lot of communication on the defects between various parties is
necessary.
-
Identification of the test environment - The test environment used, with identification of the starting situation
used.
-
Identification of the test basis - The test basis used: name of the test basis document, including version number,
supplemented if necessary with specific-requirement number.
-
Provisional severity category - Provisional: the severity category proposed by the tester.
-
Provisional priority - Provisional: the priority of solution proposed by the tester.
-
Provisional cause - Provisional: the cause of the defect as estimated by the tester.
-
Quality characteristic - The quality characteristic established by the tester, to which the defect relates.
In connection with the solution:
-
Definitive severity - The definite category of severity as determined by the defects consultation.
-
Definitive priority - The definite priority of solution as determined by the defects consultation.
-
Definitive cause - The definite cause of the defect as determined by the defects consultation. Besides the
categories mentioned for the minimum defect report, the category of “Testing” is added here.
-
Deadline or release for required solution - A date or product release is set, by which the defect should be solved.
In connection with retesting:
-
Retester - The name of the tester who carries out the retest.
-
Identification of the test environment - The test environment used, with identification of the starting point used.
-
Identification of test basis - The test basis used: name of the test basis document, including version number, if
necessary supplemented with specific-requirement number.
-
Identification of test object - The (part of the) test object that was retested. The version number or version date
of the test object is also stated.
In addition, test, defects consultation, retest and comments fields may be added, with which extra information may be
optionally supplied, e.g. on corresponding defects or the identification of the change proposal by which the handling
of the defect is brought within another procedure.
PROCEDURE
When a defect is taken into the administration, it enters the defects procedure.
Progress of the solving of defects is discussed in a periodic defects consultation. During the preparation and
specifying of tests, this consultation is usually held once or twice a week. During test execution, it often increases
to once a day. Participants in the consultation are representatives of the parties who submit and/or deal with the
defects. From within the testing, this is the test manager, defects administrator or the intermediary. Sometimes a
tester is invited to explain a defect. Other parties may be the user organisation, functional management, system
development and system management. The defects consultation is also sometimes combined with the handling of the change
proposals in, for example, a Change Control Board.
Tips:
-
Conference call - If the parties are spread over different locations (around the world), this is no reason not to
carry out a defects consultation. Conference calls or video conferencing facilitate this.
-
Ensure that each participant is well informed of how the defects procedure works and what his or her tasks and
responsibilities are. For example, who updates the status of the defects following the defects consultation?
In order of priority, the participants discuss each new defect and decide whether it should be solved, and if so, by
whom. In this consultation, the correctness, cause, priority and severity of the defects, as well as the costs of
solving them, are discussed. A familiar humorous reaction of developers in this connection is “It’s a feature, not a
bug”. The representative of the testing also has the job of ensuring that the importance of a defect (severity and
priority) becomes sufficiently clear to all the parties. The consultation may also request the submitter of the defect
to provide additional information or carry out further investigation. The participants in the consultation determine,
after carrying out the necessary discussions, the definitive values for cause, priority and severity of a defect.
If the defects consultation agrees that it is a valid defect and the costs of solving it are acceptable, the defect is
assigned to a defect solver. If the consultation agrees that it is not a valid defect or that the costs, lead-time
or regression risks of solving it are too high, it is rejected. A valid defect that is nevertheless rejected is also
known as a ‘known error’. In the event of rejection, it may be decided to submit the defect via another channel as a
formal change proposal or to devise a procedural solution. Examples of procedural solutions are notes in the help text,
instructions to the helpdesk assistants or amendment to the AO procedures. If the consultation does not agree,
then the defect is escalated to the decision forum. Representatives of the parties with decisionmaking powers sit in
this forum, such as the client and project manager, who decide on whether or not (and when) the defect is to be solved.
The decision forum is not necessarily an independent consultation, but is often the project management meeting or the
project board meeting.
The diagram below shows the relationship between the defects consultation and decision forum:
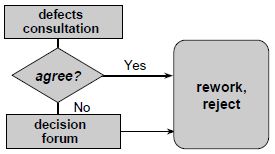
Figure 1: Defects procedure
The defect solver investigates the defect and solves it. Or it may emerge that the defect has been incorrectly
identified as such (a testing mistake) or should be handled by another defect solver. In the latter cases, the defect
goes back for discussion. If it is solved, it can be transferred at any time to the test environment to be (re)tested.
The tester, preferably the original submitter, carries out the test and checks whether the defect is solved. If so, the
defect is closed. If it appears that the defect is not (adequately) solved, then its status is reset and it again
undergoes the defects procedure. The retesting of the defect is an essential step in order to be able to close it. It
is unacceptable for the defect solver to solve the defect, test it himself and then close it. Checking whether the
defect is solved is the task of the submitter (or his replacement).
The time required for researching, submitting, processing, solving and retesting a defect is considerable. Purely
administrative and management tasks alone take between one and two hours. This is an important reason to require that
the test object be of sufficient quality to enter a test. The pretest is aimed at checking this testability.
Figure 2 shows the life cycle of a defect according to the above procedure, in which the texts in the rectangles show
the status of the defect. The diamonds refer to the actors. The dotted line from “Postponed” to ”Allocated” means that
the defect is postponed in the current release, but should be solved in a future release.
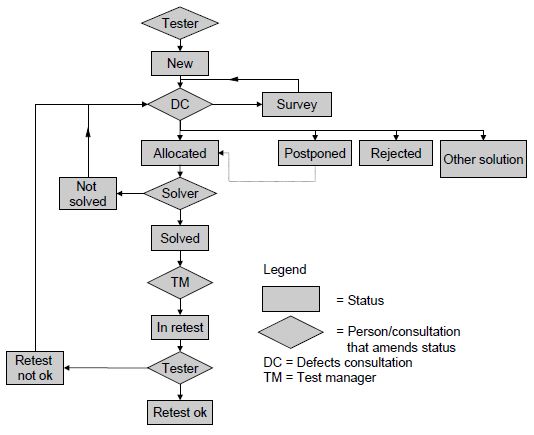
Figure 2: Life cycle of a defect
|
